DIY epoxy floors can be rewarding and cost-effective for homeowners. With the right materials and prep, anyone can get a professional-looking result. Epoxy floors offer durability, easy maintenance, and a sleek aesthetic.
Gather all the necessary tools and materials. These include epoxy resin, a hardener, a degreaser, a primer, rollers, brushes, and safety gear like gloves and goggles. Prep the floor thoroughly to ensure the adhesion and longevity of the epoxy coating. This means cleaning it to get rid of dirt or grease.
DIY epoxy floors give you the freedom to customize your design. There are color choices and decorative additives like metallic pigments or colored flakes to create personalized flooring that reflects your style. Multiple layers of epoxy can add depth and dimension to the finished floor.
To get a successful DIY epoxy floor, follow these tips:
- Read instructions carefully – understand proper mixing ratios and application techniques.
- Test in inconspicuous areas – assess how well it adheres and spot any issues early.
- Plan for proper ventilation – epoxy emits strong fumes, so open windows or use fans.
- Take your time during application – don’t rush as this could cause uneven coverage or visible imperfections.
Follow these suggestions and you can make a lasting, beautiful, and functional epoxy floor. With some creativity and the right tools, you can transform your space into a stunning showcase.
Learn more: How To DIY Resin Floors
What Are Epoxy Floors?
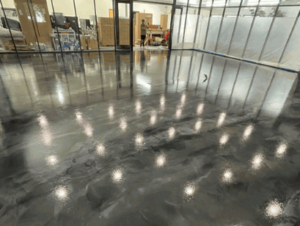
Epoxy floors are a favored pick for both domestic and business areas. They feature a tough, glossy coating, applied to concrete surfaces. Here’s some key info about epoxy floors:
- Durability: they are renowned for their durability and capacity to cope with heavy footfall and impact. They can withstand stains, chemicals, and abrasion, making them an ideal option for high-traffic places like warehouses or garages.
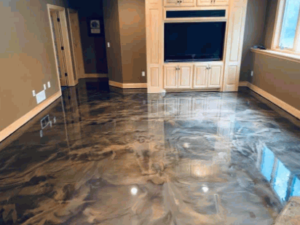
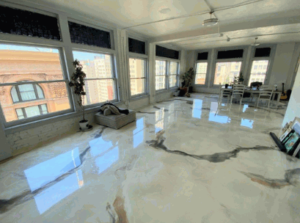
- Aesthetics: Epoxy floors come in various colors and finishes, allowing customization to pair the overall look of the space. From sleek and glossy to textured or metallic, epoxy floors can boost the visual charm of any room.
- Easy Maintenance: The non-porous surface of epoxy flooring makes it resistant to spills and stains. Regular sweeping or mopping is all that’s needed to keep the floor clean and looking great. This low-maintenance aspect makes epoxy floors a practical choice for busy areas.
- Safety: Some epoxy coatings have anti-slip properties that enhance traction on the floor surface, reducing the risk of mishaps. This makes them suitable for places where slip dangers may be present, such as entryways or kitchens.
In addition, epoxy floors can be customized with patterns or logos, for a personalized look that reflects the owner’s style or brand identity.
Epoxy floors are often used in industrial facilities due to their strength and resistance to chemicals. As per an article by Industrial Floorings Ltd., these floors can withstand harsh chemical spills without sustaining major damage.
All in all, epoxy floors offer a mix of durability, aesthetics, easy maintenance, and safety features, making them a popular choice for numerous spaces.
Benefits Of DIY Epoxy Floors
To achieve the benefits of DIY epoxy floors, explore the advantages of cost savings, customization options, and durability and longevity. These sub-sections provide you with a cost-effective solution, the ability to tailor your floors to your liking, and a long-lasting and resilient flooring option.
Cost Savings
When it comes to saving money, DIY epoxy floors are a great idea! By doing the installation yourself, you don’t need to hire professionals. Let’s look at some numbers to get an idea of how much you can save.
The table below shows the difference between the cost of professional installation and DIY epoxy floor kits:
| Professional Installation Cost | DIY Kit Cost | |
|---|---|---|
| Garage | $3,000 | $500 |
| Basement | $4,500 | $800 |
| Workshop | $2,500 | $400 |
As you can see, DIY epoxy floor kits offer huge savings. Plus, you have the satisfaction of completing the project yourself. Also, you are in full control of the process and can customize your floor to your preference.
Home Improvement Magazine experts agree that DIY epoxy floor installation can give you professional results and save you a lot of money.
Customization Options
DIY epoxy floors boast a wide range of customization options! Making your floor a work of art is as easy as choosing different colors and textures, incorporating logos/graphics, and creating unique patterns and designs.
Popular customization options include:
- Colors in vibrant hues or subtle shades.
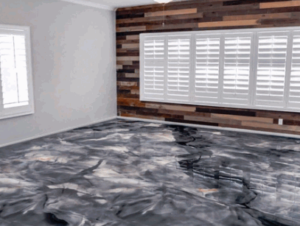
- Metallic pigments for dazzling effects – copper, silver, and more!
- Precise detailing/customization with intricate patterns and designs.
- Personalizing with logos/graphics – company logos, sports team emblems, and so on.
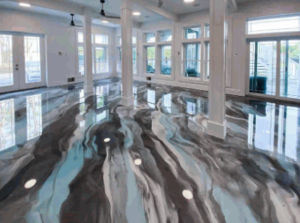
Plus, there are even more creative ways to customize epoxy floors – like glow-in-the-dark additives or marbled effects with multiple colors. What was once mainly used for industrial purposes has gained increasing popularity in residential settings, as people explore the decorative potential of epoxy coatings. DIY enthusiasts and professionals alike can enjoy the endless possibilities of customizing epoxy floors!
Durability And Longevity
DIY epoxy floors are renowned for their durability and longevity. They’re built to handle heavy foot traffic and won’t be easily damaged by chemicals, stains, or moisture. Plus, with proper care, these floors can stay looking good for years. Let’s explore the factors that make these floors so resilient.
Durability:
- Robustness: DIY epoxy floors boast impressive strength and can cope with heavy impacts without cracking or chipping.
- Scratch-proof: Furniture, pets, and other objects won’t scratch these floors’ hard surfaces.
- Heat resistance: Even high temperatures won’t warp or buckle DIY epoxy floors.
Longevity:
- Low maintenance: With epoxy floors, sweeping and the occasional mop are usually all you need.
- Color retention: Their vibrant colors won’t fade over time.
- Long life: With proper installation and maintenance, DIY epoxy floors can last up to 20 years.
Plus, DIY epoxy floors are easy to install, give you lots of design options, and are slip-resistant for improved safety.
The history of epoxy resins dates back to the early twentieth century when they were first used in industry due to their superior strength and resilience. Now, homeowners can enjoy the same durability that revolutionized the industry.
It’s no surprise that DIY epoxy floors have become popular – invest in them and you can enjoy years of beautiful, robust flooring in your home.
Preparing For DIY Epoxy Floors
To ensure successful DIY epoxy floors, start by preparing the surface thoroughly. Then, gather the necessary materials and tools needed for the project. Lastly, prioritize safety precautions to protect yourself and others throughout the process. This section focuses on the key steps and considerations for prepping your space effectively before diving into the epoxy flooring project.
Surface Preparation
Surface prep is key before starting a DIY epoxy floor project. It’s necessary to prepare the surface for proper adhesion and for the epoxy coating to last. Here’s a guide to help with the surface prep:
- Clean: Get rid of dirt, dust, grease, and other contaminants by sweeping and vacuuming. Use a detergent solution and scrub brush to clean stubborn stains.
- Repair: Look for cracks, holes, or uneven spots. Fill in gaps with a patching compound and smooth out rough spots with sandpaper or a grinder. This creates a level surface for the epoxy coating.
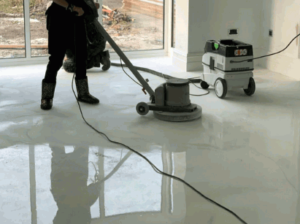
- Etch/Sand: Depending on the surface, etch or sand it to increase adhesion. Etch smooth concrete floors, and sand rough surfaces or previously coated floors.
- Remove Efflorescence: Scrub the floor with an acid-based cleaner to get rid of the white salt deposits. Or use shot blasting or grinding.
- Test Moisture Levels: Moisture can lead to epoxy adhesion failure. Check moisture levels using a moisture meter. Install a vapor barrier if there’s excess moisture.
- Vacuum Again: Vacuum the floor one more time to remove dust and debris that can interfere with adhesion.
Also, remember these tips for successful surface prep:
- Follow product-specific manufacturer guidelines and recommendations.
- Ventilate the area during cleaning and etching for safety.
- Wear protective gear like gloves and goggles when using chemicals or power tools.
- Allow enough drying time between each step.
- Check the surface for missed cleaning and repair spots before applying epoxy.
By following these steps and tips, you’ll have a well-prepared surface that maximizes the longevity and look of your DIY epoxy floor.
Materials And Tools Needed
Ready to make your DIY epoxy floors? You’ll need a few materials and tools. Here’s the list:
- Epoxy resin and hardener: Essential for getting the glossy finish. Choose a high-quality product that fits your project.
- Mixing container and stir sticks: For blending the components together to create a consistent mixture.
- Paint roller or brush: To apply the epoxy. Use a medium-nap roller for a smooth application, or a brush for intricate areas.
- Painter’s tape: To mask off any areas you don’t want to coat with epoxy.
- Safety equipment: Wear gloves, safety glasses, and a respirator.
Before applying the epoxy, make sure to clean the floor, repair any cracks, and apply a primer if needed. Follow manufacturer instructions too.
Now, get started! Gather the materials and tools and enjoy transforming your space with beautiful DIY epoxy floors. With preparation and attention to detail, you’ll create a floor that looks great and lasts.
Safety Precautions
Safety precautions are key when doing DIY epoxy flooring! Follow these guidelines for your safety:
- Wear safety gear, like goggles, gloves, and a mask for protection from chemical fumes and splashes.
- Keep the work area ventilated with open windows or fans, to avoid noxious fumes.
- Clear away any clutter to reduce the risk of accidents.
- Read the product instructions for any extra safety measures.
- Pro Tip: Do a small test area before tackling the whole project to get comfortable with the process.
Step-By-Step Guide To DIY Epoxy Floors
To achieve stunning DIY epoxy floors, follow this step-by-step guide that covers cleaning the floor, repairing any damage, applying primer, mixing and applying epoxy coating, and applying the topcoat. Each sub-section will provide you with a solution to ensure your epoxy floor project is a success.
Cleaning The Floor
Getting the floor spick and span is a must when prepping for a DIY epoxy project! Here’s how to get the surface clean and smooth:
- Take out all the furniture and stuff.
- Use a broom or vacuum to remove dirt, dust, and debris. Make sure to get all edges and corners.
- Use a mild cleaner designed for your type of flooring. Follow the instructions and apply it with a mop/sponge.
- Scrub the floor gently with a scrub brush or soft-bristle broom. Focus on stains and heavily soiled areas.
- Rinse with clean water to remove residue.
If there are stubborn grease stains or oil spills, use a degreaser. For very grimy floors, use a pressure washer with caution so as not to damage the surface.
Important reminder: A neat floor is important for the epoxy to bond properly. A dirty or greasy floor will prevent epoxy from sticking, leading to peeling and flaking.
Repairing Any Damage
- Assess the damage: Look for any cracks, chips, or dents, noting size and severity.
- Clean the damaged area: Get rid of dirt or debris with mild detergent and warm water.
- Fill in cracks and chips: Use high-quality epoxy filler and a putty knife to fill the area.
- Sand down uneven surfaces: Use sandpaper to make them level with the rest of the floor.
- Allow time for curing: Let the epoxy filler cure for several hours or overnight.
- Apply a new coat of epoxy: Cover the entire floor with a fresh coat, following manufacturer instructions.
Maintain your epoxy floor by cleaning it with non-abrasive cleaners and avoiding harsh chemicals or heavy equipment.
Take action now and give your floor the care it needs! Have a flawless and long-lasting floor that enhances your space.
Applying Primer
- Clean and prepare the surface before applying primer. Eliminate all dust, dirt, or grease with a concrete cleaner and let it dry.
- Mix the primer as per instructions. Use a paint mixer attachment on a drill for the best effects.
- Utilize a brush or roller to apply the primer. Start from a corner and work towards the exit. Don’t step on freshly primed spots.
- Backroll within 10-15 minutes of application for even coverage.
- Let the primer cure for 24 hours before continuing.
- Clean all equipment used right after to prevent hardening.
- It is essential to select the correct type of primer for your flooring needs. Consult professionals or refer to credible sources for advice.
- A truth: Using primer saves time & money in the long run as it provides adhesion and durability to epoxy floor coatings.
Mixing And Applying Epoxy Coating
Mix epoxy coating to get beautiful and long-lasting floors. Here’s a guide to help you get professional results.
- Prep the surface: Thoroughly clean it to remove dirt, dust, and grease. Repair any cracks or damage and make sure it’s even.
- Mix the resin: Follow the manufacturer’s instructions to mix the epoxy resin and hardener in the right ratio. Use a stir stick or drill with a paddle attachment to mix thoroughly.
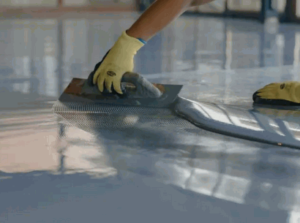
- Apply the base coat: Use a roller or brush to apply a thin and even layer of epoxy. Work in small sections to avoid overlap marks. Allow enough time for it to dry.
- Add color flakes (optional): Sprinkle color flakes onto the wet base coat. This adds texture and looks nice. Remove excess flakes when the coating is completely cured.
- Apply the topcoat: When the base coat is dried, apply a clear topcoat using a roller or brush. This will protect your epoxy floor and make it glossy. Wait until it’s dry before walking on it or placing heavy items on it.
Tips:
- Ventilate the area while applying epoxy as it releases fumes.
- Don’t apply epoxy in humid conditions as it may affect adhesion.
- Wear protective gloves and eyewear for safety.
Epoxy coating is great for garages and basements—it looks good and lasts longer.
Applying Topcoat
Achieving a flawless epoxy floor is only complete with the topcoat! Here’s a guide to help you finish:
- Prep the surface: Ensure the previously applied epoxy coat is totally dry and free of dust or debris. Sweep or vacuum away any loose particles.
- Mix the topcoat: Follow the manufacturer’s instructions to mix it properly. Use a stir stick to blend it well.
- Apply the topcoat: Begin at one end and work your way out. Use a roller or brush to spread it evenly across the floor. Avoid streaks or puddles.
- Allow proper drying time: After applying, let it dry as per the manufacturer’s instructions. This usually takes 24 hours but can vary due to temperature and humidity.
- Second coat (optional): If desired, apply a second coat for added protection and shine. Repeat steps 2-4 and give time to dry between coats.
For an even better finish, add an epoxy sealer on top of the topcoat. It will provide extra protection against stains and abrasions, which helps your floor last.
So now that you have this guide, don’t miss out on achieving the perfect epoxy floor finish! Start applying your topcoat and transform your space!
Troubleshooting Common Issues
To troubleshoot common issues with DIY epoxy floors, use this guide. Address bubbles or imperfections, uneven coating or color, and sticking or peeling as potential solutions.
Bubbles Or Imperfections
Adjust the temperature or humidity of your work environment to help prevent bubbles from forming in materials like paint or resin. Try using a degassing technique to remove trapped air bubbles. Heat or specialized equipment may be used to effectively eliminate bubbles. Invest in high-quality tools and materials designed specifically for the task at hand to reduce imperfections. Take control of your craft with these troubleshooting methods and create flawless masterpieces! Start troubleshooting now for professional-level finishes!
Uneven Coating Or Color
Uneven coating or color is a major issue in the world of coatings and colors. It can be very annoying for professionals and consumers alike. Knowing possible causes and solutions can help to tackle this problem. Here is an overview:
Possible Causes:
- Inadequate surface preparation.
- Improper application techniques.
- Environmental factors.
- Quality of materials.
Solutions:
- Thoroughly clean and prepare the surface.
- Follow correct application techniques.
- Take environmental factors into account.
- Use high-quality materials.
It’s vital to assess each situation differently. A study in the Journal of Coatings Technology and Research revealed that uneven coating or color is one of the most frequently reported issues in the industry.
Sticking Or Peeling
Sticky or peeling problems need tending to. Five key points to keep in mind:
- Check the surface for residue or moisture.
- Clean the surface. Dry it well before applying anything.
- Choose the right adhesive or paint, and follow instructions for proper application.
- Don’t press too hard when sticking or painting.
- For expert help, talk to a professional.
It could happen to walls, floors, furniture, or even electronic devices. So, you must know the surface’s characteristics.
Take proactive steps to save time and frustration. Assess the situation carefully and act according to the unique circumstances.
Maintenance And Care Tips For DIY Epoxy Floors
To ensure the longevity and beauty of your DIY epoxy floors, maintenance and care are essential. Regular cleaning and maintenance, avoiding damaging chemicals or sharp objects, and touch-ups and re-coating are crucial steps to keep your floors in pristine condition. Let’s explore each sub-section to understand the solutions for maintaining and caring for your epoxy floors.
Regular Cleaning And Maintenance
Regular cleaning and maintenance are important for keeping DIY epoxy floors looking great and lasting long. Follow these tips:
- Sweep or vacuum the floor often.
- Use pH-neutral cleaners and soft mops/cloths for spills/stains.
- Don’t use harsh chemicals or abrasive cleaners.
- Put doormats at entryways to trap dirt.
- Apply fresh epoxy sealer every few years.
For better care, don’t use steam mops. Use gentle methods instead.
Interesting: Epoxy floors can last 20 years with proper care, according to Home Flooring Pros! That’s long-lasting beauty with minimal effort!
Avoiding Damaging Chemicals Or Sharp Objects
It’s crucial to dodge damaging chemicals and sharp objects to maintain your DIY epoxy floors and guarantee their durability. Scratches, stains, and damage to the protective coating can occur when these come in contact with the surface. Here are some tips to help you avoid them:
| Tip 1 | Steer clear of harsh cleaning chemicals with bleach or ammonia. |
| Tip 2 | Clean with a pH-neutral cleaner specifically designed for epoxy surfaces. |
| Tip 3 | Don’t drag or slide heavy furniture across the floor. |
| Tip 4 | Put felt pads underneath furniture legs. |
Be careful while working on your DIY epoxy floors too. Dropping sharp tools or objects can cause permanent marks or even chip the coating. Mats or protective coverings are a great idea in areas of high foot traffic or potential accidents.
For instance, a homeowner once spilled a strong solvent on their newly installed DIY epoxy floor. The solvent corroded the coating, leaving an unsightly mark that was hard to repair. This is a reminder to always handle chemicals with care and protect your epoxy floors from sharp objects.
By following these tips and being aware of what your epoxy floors are exposed to, you can keep them looking as good as new for years.
Touch-Ups And Re-Coating
When it comes to caring for DIY epoxy floors, touch-ups and re-coating are important. Here’s the lowdown:
- Inspect regularly. Check for cracks, chips, or peeling coating.
- Do small touch-ups. Use a touch-up kit with epoxy resin and a brush/roller.
- Clean the affected area first. Use mild detergent and warm water to remove dirt, grime, and grease. Let it dry completely.
- Create a smooth surface. Sand down any rough edges or raised areas with fine-grit sandpaper.
- Read manufacturer instructions. Follow their recommended steps for best results.
Also, remember proper ventilation. Wear protective gear like gloves and goggles.
Conclusion – Enjoying Your DIY Epoxy Floors
DIY epoxy floors can be achieved with smart planning, preparation, and execution.
- First, know your materials – epoxy resin and hardener. Follow the instructions precisely.
- Clean and prep the concrete surface before applying the epoxy. Stick to the manufacturer’s guidelines for mixing and application.
- Let the epoxy cure – this may take time, depending on temperature and humidity. Avoid walking or placing heavy objects until fully cured.
- To make your DIY epoxy floors even better – add decorative elements like colored flakes or metallic pigments.
- Apply a clear topcoat for extra protection and shine.
Pro Tip: Have all the necessary tools and safety equipment ready. Ventilation, gloves, safety goggles, and a respirator are essential for success and safety.
By following the guidelines and taking care of each step, you can create beautiful DIY epoxy floors that will last.